If you use a lever type swage tool, you know how important it is to keep it working smoothly. But do you really know what kind of maintenance it needs to stay in top shape?
Ignoring simple care steps can lead to problems that slow you down or even damage your tool. You’ll discover easy and effective maintenance tips that will save you time, money, and frustration. Keep reading to learn exactly what you should do to make your lever type swage tool last longer and perform better every time you use it.
Credit: www.hvacshop.com.au
Lever Type Swage Tool Basics
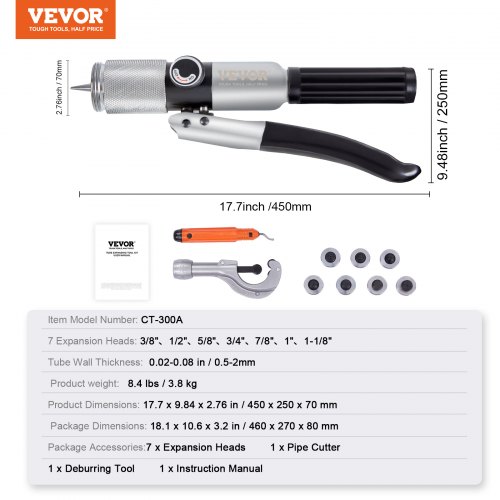
The lever type swage tool is a simple yet powerful device. It helps shape and join metal tubes or wires. Understanding its basics improves proper use and care. This tool works by applying force through a lever to form metal fittings. It is commonly used in various industries for making strong connections. Knowing the key parts and uses helps maintain and operate it effectively.
Key Components
- Lever:The handle that provides mechanical advantage.
- Die:The shaped part that forms metal when pressed.
- Frame:Holds the die and lever together securely.
- Pivot Pin:Connects the lever to the frame, allowing movement.
- Locking Mechanism:Keeps the tool closed during use.
Common Uses
- Forming fittings on metal tubes and wires.
- Creating strong connections in plumbing and HVAC systems.
- Shaping metal parts for automotive repairs.
- Crimping electrical connectors securely.
- Used in metalworking and manufacturing tasks.
Routine Cleaning
Routine cleaning is essential to keep your lever type swage tool working smoothly and extend its lifespan. Dirt and grime can build up quickly, especially if you use the tool frequently or in dusty environments. Regular cleaning helps you spot potential issues early and keeps the tool ready for precise operations.
Removing Debris
Start by wiping off any visible dirt and dust with a clean, dry cloth. Use a small brush or compressed air to clear out debris from tight spots where your fingers can’t reach. Ignoring these particles can cause the tool to jam or wear unevenly over time.
Pay special attention to the jaws and hinge areas, as tiny metal shavings or dirt often collect there. Have you noticed your tool sticking or not closing properly? That’s usually a sign debris has built up and needs to be cleaned out.
Lubrication Points
After cleaning, apply a light machine oil or lubricant to the pivot points and moving parts. This reduces friction and prevents rust, making your tool easier to operate. Use just a few drops—excess oil can attract more dirt, which defeats the purpose.
Check the manufacturer’s recommendations for the best type of lubricant. Once applied, open and close the tool several times to distribute the oil evenly. Do you find your tool feels stiff or noisy? Proper lubrication can solve that problem quickly.
Inspection Tips
Regular inspection keeps the lever type swage tool working well. It helps find small issues before they become big problems. Careful checks improve safety and extend the tool’s life. Knowing what to look for saves time and money.
Checking For Wear
Look closely at all moving parts. Check for signs of rubbing or thinning metal. Worn areas might appear shiny or rough. Pay special attention to the jaws and lever. These parts handle the most pressure and wear out faster. Use a magnifier to see small cracks or rough spots. Replace parts that look worn to avoid failure.
Identifying Damage
Search for dents, bends, or cracks on the tool. Damage can weaken the tool and cause accidents. Check the handle for bends or breaks. Look at the swage head for any chips or cracks. Test the tool by opening and closing it smoothly. Any stiffness or unusual noise may mean hidden damage. Fix or replace damaged parts immediately to stay safe.
Lubrication Guidelines
Proper lubrication keeps your lever type swage tool working smoothly and extends its lifespan. Without the right lubrication, the tool can seize up or wear out faster, leading to costly repairs or replacements. Knowing what type of lubricant to use and how often to apply it will save you time and prevent unexpected downtime.
Best Lubricants
Use light machine oil or a multipurpose lubricant designed for hand tools. These lubricants reduce friction and protect metal parts from rust and corrosion. Avoid heavy greases that can attract dirt and grime, which might clog the tool’s moving parts.
Some professionals recommend using a silicone-based lubricant for plastic or rubber components to prevent drying and cracking. If your tool has any specialized parts, check the manufacturer’s instructions for any specific lubricant recommendations.
Frequency Of Application
Lubricate your swage tool after every 10 to 15 hours of use or at least once a month if used infrequently. Regular lubrication prevents buildup of debris and keeps the joints and lever action smooth.
Before applying lubricant, clean the tool thoroughly to remove dirt and old grease. Ask yourself: Have you noticed any stiffness or unusual resistance while using your swage tool? If yes, it’s a clear sign you need to apply lubricant immediately.
Adjustments And Calibration
Adjustments and calibration are essential for lever type swage tools to work correctly. Proper maintenance keeps the tool accurate and extends its lifespan. Regular checks prevent poor performance and damage during use.
Fine-tuning the tool ensures each swage is precise. Calibration helps avoid errors in size and shape. Small misalignments can cause weak or faulty joints, making adjustment critical for safety and quality.
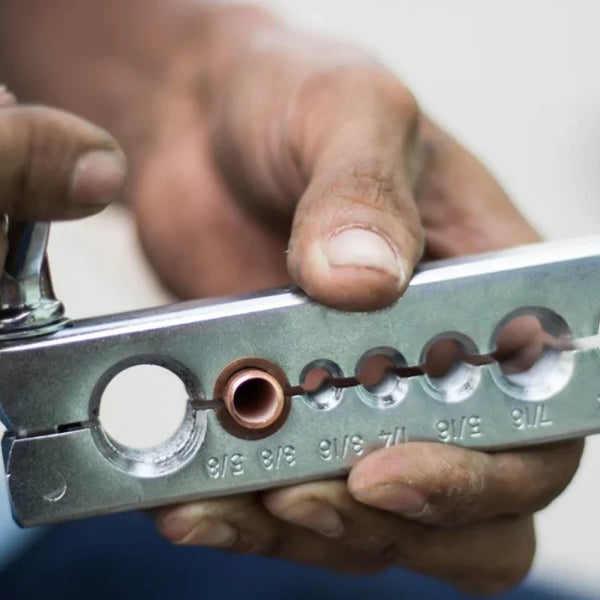
Ensuring Proper Alignment
Check the tool’s jaws and dies for correct alignment before use. Misaligned parts cause uneven pressure and poor swaging results. Use a straight edge or alignment gauge to verify accuracy.
Adjust the jaws carefully to match the correct position. Tighten any adjustment screws or bolts holding the parts in place. Ensure the tool closes smoothly without gaps or wobbling.
Tightening Loose Parts
Inspect all nuts, bolts, and screws for looseness regularly. Loose parts reduce tool stability and accuracy. Use a wrench or screwdriver to tighten any loose components firmly.
Focus on the handle pivot points and swaging dies. Apply thread locker if needed to keep screws secure. Regular tightening stops parts from wearing out too quickly or falling off.
Storage Recommendations
Proper storage of a lever type swage tool extends its life and keeps it working well. Storing the tool correctly prevents damage and ensures it stays clean and ready for use. Follow these storage recommendations to protect your swage tool from common issues.
Protecting From Rust
Rust forms when metal meets moisture and air. Keep the tool dry at all times. After use, wipe the tool with a clean, dry cloth. Applying a light coat of machine oil helps stop rust from forming. Store the tool in a low-humidity area. Avoid places like basements or outdoors where moisture is high.
Safe Storage Practices
Store the swage tool in its case or a protective pouch. This prevents dust and dirt buildup. Use tool racks or shelves to keep it off the floor. Avoid stacking heavy objects on top of the tool. Keep the tool away from direct sunlight to prevent heat damage. Label storage areas for easy access and organization.
Troubleshooting Common Issues
Troubleshooting common issues with a lever type swage tool helps keep it working smoothly. Small problems can stop your tool from operating properly. Regular checks and simple fixes prevent bigger damage and save time.
Understanding how to handle these common issues ensures your tool lasts longer. It also improves the quality of your work. Focus on key problems like stiff lever movement and inconsistent swaging for best results.
Handling Stiff Lever Movement
Stiff lever movement often means the tool needs cleaning or lubrication. Dirt and debris can build up inside the joints. This buildup makes the lever hard to move.
- Clean the lever and pivot points with a soft brush or cloth.
- Apply light machine oil to the moving parts.
- Move the lever back and forth to spread the oil evenly.
- Check for any rust or corrosion and remove it carefully.
Stiffness may also come from worn or damaged parts. Inspect the lever and replace any broken components to restore smooth movement.
Fixing Inconsistent Swaging
Inconsistent swaging causes poor joint connections and weak results. Check if the dies are properly aligned and clean. Dirty or misaligned dies reduce the pressure applied during swaging.
- Remove any dirt or metal shavings from the dies.
- Adjust the dies to ensure they fit tightly and evenly.
- Verify the swage tool is calibrated to the correct pressure settings.
- Replace worn dies to maintain consistent swage quality.
Also, confirm the material being swaged matches the tool’s specifications. Using the wrong size or type can cause uneven results.

Credit: www.vevor.ca

Credit: www.acservicetech.com
Frequently Asked Questions
How Often Should I Clean A Lever Type Swage Tool?
Clean your lever type swage tool after every use. Remove dirt, debris, and metal shavings to prevent damage. Use a soft brush and mild solvent for thorough cleaning. Regular cleaning ensures smooth operation and extends tool life.
What Lubricant Is Best For Lever Type Swage Tools?
Use light machine oil or a specialized tool lubricant. Apply it to moving parts and joints to reduce friction. Regular lubrication prevents rust and ensures smooth functioning. Avoid heavy oils that can attract dust and dirt.
How Do I Inspect A Swage Tool For Wear?
Check for cracks, worn jaws, and loose parts regularly. Inspect the handles and pivot points for damage or stiffness. Replace any damaged components immediately to maintain tool efficiency and safety. Routine inspection prevents unexpected tool failure.
Can I Store A Lever Type Swage Tool Without Maintenance?
No, proper storage requires cleaning and lubrication first. Store in a dry, cool place to prevent rust and corrosion. Use a protective case or cover to avoid dust accumulation. Regular maintenance before storage keeps the tool ready for use.
Conclusion
Regular maintenance keeps your lever type swage tool in top condition. Clean it thoroughly after each use. Check for any worn-out parts. Replace them promptly to avoid damage. Lubricate moving parts to reduce friction. Store the tool in a dry, safe place.
This prevents rust and extends its lifespan. Always follow the manufacturer’s guidelines. Using the tool properly ensures safety and efficiency. A well-maintained tool saves time and effort. Keep your swage tool ready for use anytime. Regular checks and care make a big difference.
Take these steps to maintain your tool effectively.